Pages

Friday, April 27, 2012

RO-GB sign-ups and 'Final'ly Friday Linky


'Final'ly Friday Linky at the bottom - don't forget to post about your recent fabulousness!

RO-GB double charm (brick) swap:
So....I am organizing a double-charm(5"x10"), (3) yard, split-complimentary color swap - using red-orange, green, and blue color pallet.  Each participant will purchase (1) yard each of (3) fabrics [(1) red-orange, (1) green, and (1) blue].

Sew Sane Jane
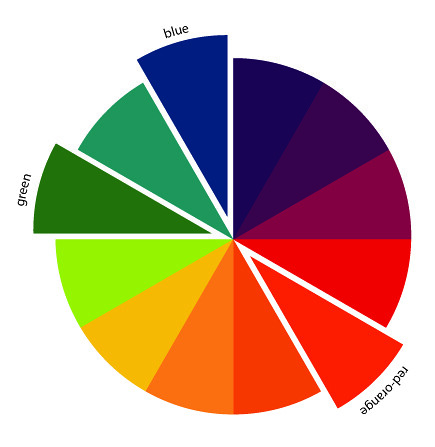
I posted all the gritty details in my last post HERE.  Please refer to that post if this is the first you are hearing about the swap.  For those that know and agree to the details, here is a bit more an the colors I have chosen.  Again, I want to be sure to give credit to Jenni of In Color Order. She has been an amazing resource of color knowledge and expertise!!  She wrote a blog series on "The Art of Choosing [Colors]."  I have learned a lot about color reading her blog - including about split-complimentary colors.  I love several of the color combos, but am leaning towards the red-orange, green, blue color combo.  Below is the color wheel that Jenni made to depit this combo of colors:
Red-orange, Green, Blue
Thank you to Jenni of www.incolororder.blogspot.com
for creating the fabulous color wheel for our viewing pleasure
We still have about 10 spots available.  If you have any questions feel free to leave a comment or e-mail me. To sign up, Please complete the sign-up form HERE

Okay, Color talk.  In my details of the swap, I wrote that "the fabric can have flecks of other colors, but should still 'read' the specific color."  This is somewhat hard to explain without pictures.  What I mean essentially is that I should be able to glance at a fabric and say, "that's a X color fabric."  For instance, if I am looking for green fabrics, I want to find something that is primarily green.  If it has too many or too predominate other colors in it, I don't focus on the green.

I went to Hawthorne Threads (a great online fabric site where you can search for fabrics by a color grid.) and pulled a few fabrics for an example.  You can click on each fabric for information about print and to go to the Hawthorne site for purchasing.  While these are a wide variety of greens - they all read green.
     

 While these have green in them, the other colors/patterns seem to pull the eye away from the green.  Thus, while all great fabrics, I would not recommend them when searching for a fabric that "reads" green.


Reminder: Join the Fabric Swap Finder Flickr Group to hear about upcoming swaps, give input into the next swaps, post about and solicit members for your next swap, etc.




Tuesday, April 24, 2012

Swap-Tastic Newness = RO-GB

One Down, One Up, and More to Go.  I am now ADDICTED to hosting swaps!!  (and participating of course!!)

One Down: So I have recently wrapped up my Charm-Tastic Color Swap.  We swapped 5" rainbow charms - each of 28 participants assigned a color to result in loveliness:
Click on button to see our flickr group of all fabrics chosen
I had a great time hosting the swap (I know I vented a bit in my last update, but although I feel awful being the heavy, it worked) and want to start another right away!!!  I have been kicking around ideas for a bit.  I have (2) different ideas forming in my head, but think for this swap I am going to go for "Split-Complimentary Colors." 

One Up: I love the idea of complimentary colors (colors that are across from each other on the color wheel) - which is likely why I have been loving the teal/red color combo lately.  However, I also feel like that color combo has been in a few recent swaps.  I don't want swappers to get bored with the same color swaps and not paticipate.  Thus, I decided to try a variation on the comlimentary color swap - a split complimentary color swap.

Jenni of In Color Order has been an amazing resource of color knowledge and expertise!!  She wrote a blog series on "The Art of Choosing [Colors]."  I have learned a lot about color reading her blog - including about split-complimentary colors.  I love several of the color combos, but am leaning towards the red-orange, green, blue color combo.  Below is the color wheel that Jenni made to depit this combo of colors:
Red-orange, Green, Blue
Thank you to Jenni of www.incolororder.blogspot.com
for creating the fabulous color wheel for our viewing pleasure
So....I am organizing a double-charm(5"x10"), (3) yard, split-complimentary color swap - using red-orange, green, and blue color pallet.  Each participant will purchase (1) yard each of (3) fabrics [(1) red-orange, (1) green, and (1) blue].


Sew Sane Jane

SWAP STILL OPEN.  WE NEED ABOUT 10 MORE PEOPLE TO SIGN UP.  Remember, you only have to purchase 3 yards of fabric, and you receive a fabulous mix of fabrics in the same color scheme that equals 3 yards back. To sign up, Please complete the sign-up form HERE

Side Notes:

  • Once you choose submit for that section, that information will be sent to me but others will not be able to see it.  I will send out a confirmation e-mail to you and solicitation to join our flickr group.
  • You will need to be on flickr to participate (so sign-up for an account if you do not have one).  
  • Please only sign up if you are in a smoke-free home as smoke clings to fabric like you would not believe.  
  • International participants welcome - we will just have to adjust shipping dates to ensure we get everything in a timely manner. 
  • Our goal is that I have all fabric received by 6/4 at the latest so I can collate and send out directly

The Deal:
Once you get a confirmation of participation e-mail from yours truly:
  • You will buy (1) yard of fabric of (3) different fabrics - [(1) red-orange, (1) green, & (1) blue]
    • fabric should be 100% high quality quilters cotton (from LQS or reputable online quilt fabric store - NO JoAnn or Hobby Lobby fabric allowed - it really isn't as good of quality!)
    • Your fabric should "read" the specific color, but it can have small flecks of other colors if you choose.  
    • You may go for solids or prints as you see fit.  If choosing prints: you should steer clear of large print fabrics as once they are cut into 5"x10" double charms you loose the print.
    • do NOT wash your fabric.  
  • You will post on our flickr group which prints you have selected to ensure there are no doubles.  When you do, this is where you should also include info about the print for others to see - fabric name, line, company (this is always helpful if you fall in love with a fabric and need more for your stash!).
  • You will cut your selected fabric into "Double Charms" = 5"x10" charms (Tutorial for cutting posted soon - careful as you cut these - or you might need 1 1/8th yard of fabric)
    • Each yard of fabric should = (28) 5"x10" charms.  Which means that total you will be sending me (84) double charms total.
  • You will put your stacks of fabric into a Ziploc baggie and include the details of you and your fabrics on an index card
    • your name, e-mail address, physical address, fabric name and company, ...
  • You will send me your fabric, index card, and a self addressed, stamped envelope (SASE) (Flat Rate envelopes are FABULOUS!) to me no later than 6/4 (I'm going to be out of town a week in there so that's why the extra week).  
    • I recommend using a flat-rate envelope ($5.15-5.30) as it is the simpliest way to ensure that the return package is pre-paid fully. 
    • ***Make sure that you get stamps for pre-paid or complete the transaction online as a print-out.  There were some issues for my last swap about other methods of pre-payment.  Namely, if your post office gives you the barcode version with the date stamped on it - my post office yells at me and threatens to not send it through unless I pay another $5.15.  The ones with the $5.15 stamps or the print-outs from USPS online had no trouble or scolding
  • Enjoy your (84) double-charms once they are sent back to you!
 If you (international or not) would prefer that I cut the fabrics - Order fabrics online, have them sent to me, and for a nominal fee I will cut for you.  If you are intested in this option, please contact me and I will set up an Etsy "sale" for this (to cover the nominal fee + cost of shipping back to you in lieu of SASE (US residents: this totals $9.00; international participants: $20.00USD))

Hopefully More to Go: Stay tuned to this blog AND the Fabric Swap Finder for more swaps coming throughout the year ... ADDICTED!!


Reminder: Join the Fabric Swap Finder Flickr Group to hear about upcoming swaps, give input into the next swaps, post about and solicit members for your next swap, etc.


Friday, April 20, 2012

'Final'ly Friday Linky & Lots of Littles

IT'S FINALLY FRIDAY!!  (Insert Happy Dance Here!) and Lots of Littles (meaning little updates)
(Linky (and instructions) at bottom of this post to link-up progress made this week.)

Updates:
Inspiration Stacks update
For me, I have mostly had to work this week.  I did work a bit more trying to fight with my inspiration and stacks project.  I mostly have scrapped the idea of making it into a mini quilt (the pieces were too big for a mini, mini quilt, and I didn't have enough of all the fabric to make a decent size mini quilt).  Instead, I think I might turn it into the center of what will be a new ironing board cover.

So you might be able to tell a bit from the picture, my current ironing board cover is dull and disgusting!  I had a VERY cute one when I first purchased the item - but my iron has a tendency to spit brown water, and the old one quickly got gross.  I went to a few stores, and to buy a cute new cover costs almost the same as buying a new ironing board!!  So I thought I would just make one.  That was about 2 years ago.

In the mean time, I got a boring, ugly one from Wal-Mart (I rationalized that I shouldn't pay too much money for it, but I could use it as a pattern/template when the time came.  I still have the same one  - only now covered with ugly brown water spots of its own.  This will perhaps be the very inspiration I need to actually get to making a cover that I am not so ashamed of that I hide it in pictures!

I also have an update on the
that I am hosting.  
So one of the drawbacks to hosting is that I have to be the heavy.  I have a participant that I knew was going to be up to a week late with her fabrics.  At the time that I let her sign up anyway, I had 12 of 28 people, and figured that even if she sent it a week late, I would still be sorting and it wouldn't hold me up at all.  Now, two weeks late, I am having to send a sad e-mail that says, now or never.  That makes me feel awful because life happens and I know she really wants to participate!  I also know that I have others waiting patiently for their fantastic charms.  They are ready so send....almost.  I have all the colors sorted (that's my OCD kicking in that they have to be in color order) and all I will need is about an hour or so to do the final collating line.  

and as soon as I get the last set of fabrics (either from the participant or an alternate) - they are off! Whoo Hooo!

I also figured that I would give you a heads-up to a great little friendly competition going on over at Sew Happy Geek.  Jenna created a "Play Mini Quilt Competition."  You choose a card (from a deck of playing cards) and create a mini quilt using that card as your inspiration.  She has found LOTS of fantastic sponsors to give fabulous prizes for winners of various categories.  I'm excited to get designing and see what everyone else comes up with.   Check it out and think about joining!

SewHappyGeek Play Button


LINK US UP TO YOUR 'Final'ly Friday updates:
Here are the Linky Party rules (fairly standard from my experience)
  1. Link up a Recent work you have blogged about (in the last week or two)
  2. Link up to (2) recent projects
  3. Your projects should be crafty in nature (a DIY of some sort)
  4. Somewhere in your original post you should link to SewSaneJane 
    1. you could either grab the button below (on in right column) and insert directly into your post, or insert a text hyperlink (such as: I am linking up here to 'Final'ly Friday w/SewSaneJane or I am linking up here with [insert code from below grab button here in your HTML view])
  5. Visit at least (2) other link-ups at some point in the week - try to formulate a relevant comment on at least (1) of those link-ups (paying it forward of sorts - if you view and comment, others will do the same of your work)
**I will have the link party open all day on Friday and go into next week for you to link-up.  Even after the linky party closes, you can still see link-ups and visit their projects.  Hope you enjoy linky parties as much as I do!  With that in mind, the grab button is off in the right column if you are interested (feel free to add to your blog and include in your posts as you see fit).  Link away (find link widget just below my signature pic)!!


Tuesday, April 17, 2012

Inspiration "Stacks" and a growl

So about 6months ago I bought these perception cards from Usborn Books. I got them to use in class when I get to the Sensation and Perception chapter (educator by day). I like most of the 50 cards that were in the set, but I actually had this one hanging on my board in my office.


Depending on your reference point, the blocks could be stacked so the darkest color is the top of the block, the bottom of the block, or even the side of the block. This entertains me greatly, and I stare at it frequently!!

So one day while I was not grading, I decided i should try to replicate with fabric.

This is where the growling. Comes into play. I fist decided to try with some pinkish/purplish fabric as a trial run. I didn't have much of these fabrics, I just wanted to test out some different size ideas.


So I finally figured out the general size I wanted, but apparently put the triangle in on the wrong angle. Additionally, I forgot to shift when I was pinning to allow for the 1/4" seam, this it looked pretty awful when I got done.

I decided to try with another color family, a blue/teal combo. I was feeling confident since I knew what went wrong, and cut all the fabric of the relevant colors.....


This was fine except I forgot to cut on the opposite diagonal so when I rotated 90*, I realized it wouldn't line up right. More growling!!! So, I had to go back and cut all the pieces down a bit so they were 4.5" on all sides (previously cut to 4.5"x5.5").


Which also meant that I had to re-cut the 60* triangles to 4.5" too.


I liked it all laid out (although I think the triangles might be too wide. I need to think about that a bit longer.)


More on the rest the the growls of this project later! I didn't have a fun time piecing this together and think it will become a runner down the center of a new ironing board cover.

 I still like this idea but need to make some changes to the sizes I think . (and reading a few other blogs for tips about sewing equilateral triangles won't hurt either :)

Linking up with:
WIP Wednesday at Freshly Pieced


Friday, April 13, 2012

'Final'ly Friday Linky #2 - and a decision

So I have been obsessing over the pieces plus design for a bit if you remember.  I showed layout options as I couldn't decide how to handle the charm size pieces pluses I had made.  I finally made a decision.....

I finally decided based on reviewing the pics of the three options a few times after a bit of a break to get a fresh viewpoint.  (comments also helped - thanks).  

I used a few charms I had laying around - and some leftover "snow" Kona fabric from a previous project. Thankfully (once again) I am a perpetual over-purchaser as I had enough of this left.  

I described a bit in the last post about how I cut the charms to create the 3 pieces of each print fabric I would need.  I did the same with the Kona Snow fabric - only using yardage so I cut WOF to 2.5" and then cut (8) 2.5" squares and (4) 5" strips.

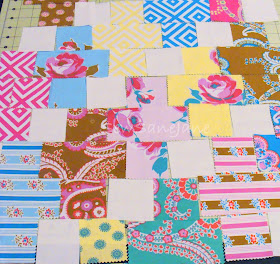
Once I was done cutting, I laid out the pieces on my work table so I could see what it looked like.  I started in the center and worked my way out in each direction until I had a size just over 21"x31" finished (with the quarter inch seams - the actual layout was more like 26"x40"ish).  

Pin and sew each row (chain piecing is your friend!!).  Sew each segment in the rows, the press seams - I pressed to one side or the other, but it shouldn't matter much on this project.  I like to sew rows together in even widths to reduce pulling and stretching - so sew two rows together, then sew a set of two to a sew of two, a set of four to a set of 4, etc....  (I pressed row seams open to reduce the bulkiness at each row)

Once all rows are sewed together, I cut down to size (using the shortest rows as a guide)

I actually have a use for this size of "top," (it is a bit smaller than the last + quilt top I made) so I pinned a piece of terry cloth to the front of the "quilt" and sewed around the edge with a 1/4" seem.  Leave an opening for turning of about 6-8".  Once done, trim corners and turn right-side out.  Press edges and turn in the opening 1/4".  Top stitch around edge to ensure it stays together.  

I added a few free-hand waves to quilt the layers together and - you now have yourself an UNBELIEVABLY useful item.  

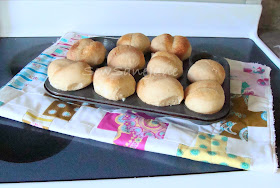
I use mine as one of these options nearly on a daily basis: dish dryer (especially when I empty the dishwasher and am left with all that water on the top of plastics), a massive trivet for a pan, an ovenmit for large pans and such to stretch from side to side, or a table runner as my needs fit.


So that is my 'Final'ly Friday project - what's yours?


 Here are the Linky Party rules (fairly standard from my experience)
  1. Link up a Recent work you have blogged about (in the last week or two)
  2. Link up to (2) recent projects
  3. Your projects should be crafty in nature (a DIY of some sort)
  4. Somewhere in your original post you should link to SewSaneJane 
    1. you could either grab the button below (on in right column) and insert directly into your post, or insert a text hyperlink (such as: I am linking up here to 'Final'ly Friday w/SewSaneJane or I am linking up here with [insert code from below grab button here in your HTML view])
  5. Visit at least (2) other link-ups at some point in the week - try to formulate a relevant comment on at least (1) of those link-ups (paying it forward of sorts - if you view and comment, others will do the same of your work)
**I will have the link party open all day on Friday's for you to link-up.  Even after the linky party closes, you can still see link-ups and visit their projects.  Hope you enjoy linky parties as much as I do!  With that in mind, the grab button is off in the right column if you are interested (feel free to add to your blog and include in your posts as you see fit) and linky will be opening starting Friday 12:01am-11:59pm.  Link away (find link widget just below my signature pic)!!


Tuesday, April 10, 2012

addition obsessed- and help needed

So clearly I get a bit obsessive over various things.  They are generally short lived, but amidst  the obsession, I cannot help but over-produce.  For instance, I am currently slightly obsessed with the pieced plus signs I have been seeing all over blogland.  I have thus far started (2) "practice" pieces in anticipation for a large quilt concept once I like the final product.

I have been toying with the idea for a month or so, but finally decided to give it a shot.  Now, something you need to know about me - I LOVE getting inspiration from you all, but I also like the challenge of re-creating something I see without actually following a given tutorial.  (I do use patterns and tutorials from time to time - especially if someone picked out something in particular - ie// my Mom's quilt - or if I am trying a brand new technique that I lack confidence in).  It gives me greater pleasure in completing when I can say that I am also improving my spatial skills at the same time.
Remember, I am mostly on a fabric purchase break - so I decided to use up some of a leftover layer cake from last year.  I didn't have a full layer cake that I wanted to use for practice, so this ended up being a VERY strange size!!


With the above in mind, I decided to "wing-it" when it came to this plus pattern idea.  It is a generally simple row by row concept - the biggest challenge is sizing.  squares are pretty easy - I just cut each piece of the layer cake into 3.25" squares so I could get 9 squares out of each piece.  Once cut, I laid out 5 pieces of one pattern and began building from there.  Clearly I could use some work on coordinating colors/patterns for the biggest impact.  (I tend to put different patterns next to each other - but need to be more aware of the size and general saturation level of each.  After I finished and sewed it all up, I definitely think I needed more of the "solid" pieces to help make the other prints stand out more.)  I sewed each row and Voila - a pieced "addition" AKA plus pieced top.  Now, if only I knew what to do with a "quilt" top that was this really awkward size!!!  Hmmmmm - note to self - stop making mini quilts that are too big for anything and too small to be useful!!

Because I didn't love the colors (or size) of this when I got done, I decided to repeat with some charm size swatches I received as a thank you for hosting a deal a few months ago.  Charms meant that I needed to adjust sizing.  I didn't want too small of squares, so I decided to adjust the plus design a bit.  I cut the charms in half first (= 2.5"x5").


Then I took ONE of those halves from each charm and cut it in half again (so I had [2] 2.5"x2.5" squares and [1] 2.5"x5" pieces).
Okay - here is where I'm stuck.  I tried several different methods of laying out the pieces to try to maximize the prints and the overall plus design.

Option A (mostly ruled out - but now re-considering a bit):


option 1:


option 2:


option  3:

Going to be linking up with:
WIP Wednesday at Freshly Pieced